What samples are most useful for microbiological testing?
Earlier this week a colleague asked me to prepare a short piece about collecting samples from fuel systems when the intention was to perform microbiological tests. My initial response was to refer her to ASTM Practice D7463 Manual Sampling of Liquid Fuels, Associated Materials and Fuel System Components for Microbiological Testing and my recently published chapter on sampling in ASTM Manual 1, 9th Edition. My colleague responded that she was really looking for a two-page summary that she could share with her customer who wanted to monitor their fuel systems from microbial contamination. Today’s post provides that summary.
The right stuff…
I first addressed sampling in Fuel & Fuel System Microbiology Part 2 (December 2016) and discussed sample perishability in Fuel & Fuel System Microbiology Part 6 (January 2017), but have not previously addressed sampling directly in this posts. Two key principles lie at the heart of sampling for microbiological testing:
1) 1. Fuel & Fuel System Microbiology Part 2Samples are diagnostic – not representative, and
2) 2. Microbial communities develop at interfaces.
What’s a diagnostic sample?
Microbiological sampling is unique in that the objective is to capture a sample from a location that is most likely – within a fuel system – to harbor microbes. Our intent is to diagnose the risk of microbes causing damage (biodeterioration) to either the fuel or fuel system. This is in stark contrast to the more common objective of collecting a representative sample – one that we can use to determine whether the product is fit for its intended use. Consequently, I use the term diagnostic to differentiate microbiology samples from fuel samples.
What is an interface?
Interfaces are zones where two or more components of a system come into contact with one another. Figure 1 illustrates the interfaces found in fuel systems:
- Fuel-vessel – the surface of tanks and other system components that are in contact with fuel.
- Fuel-water – the surface at which fuel and fuel-associated water meet. The primary fuel-water interfaces are between fuel and bottoms-water, and between fuel and biofilms (slime layers) coating system surfaces.
- Fuel-headspace – in fixed roof tanks, the fuel’s surface that is in contact with the tank’s air/vapor zone (ullage)
- Water-vessel – areas of direct contact between fuel-associated water or biofilm and system surfaces.
- Water-sediment (sludge/sediment) – the top surface of any sludge or sediment layer hat has accumulated on the tank bottom.
- Sludge/sediment- vessel – the interface between sludge or sediment and tank bottom.
- Vapor-vessel – exposed surfaces in a fuel tank’s ullage zone.

The best fuel system microbial contamination diagnostic samples come from tank bottoms or interfaces. In practical terms, these are typically tank drain or bottom grab samples.
Sample collection – bottom drain
Supplies
- Absorbent spill pads
- Alcohol – methanol or ethanol liquid or wipes
- Bottle, clear glass, Boston round, or HDPE, wide-mouthed, 500 mL.
Note: Clear glass makes it easier to observe phase, particulates, etc. However, analytes, such as adenosine triphosphate (ATP) can adsorb onto glass – making HDPE the preferred container material for samples to be tested for ATP. - Bucket, 5 gal (20 L)
- Funnel
- Gloves, surgical
- Rags, shop
Procedure
- 1. Place absorbent spill pads on ground around drain to ensure that any spillage or splashing will be captured by pads.
- 2. Don gloves to protect hands and to reduce risk of contaminating sample with microbes from your skin.
- 3. Use alcohol to wipe down exposed surfaces of bottom-drain and funnel.
- 4. If there is sufficient space between ground (floor) and drain, place sample bottle into bucket and place bucket under drain.
- 5. Remove cap from sample bottle, place wide-end of funnel under drain and narrow-end into sample bottle.
- 6. Open drain and fill sample bottle approximately 75 %.
- 7. Close drain, remove funnel from sample bottle, replace cap, and label sample bottle with:
a. Sample source identification
b. Sample collection date and time
c. Identity of sample collector - 8. If sample is not going to be tested immediately, place in ice of refrigerator.
Sample collection – bottom grab
- Absorbent spill pads
- Alcohol – methanol or ethanol liquid or wipes
- Bottle, clear glass, Boston round, or HDPE, wide-mouthed, 500 mL.
Note: Clear glass makes it easier to observe phase, particulates, etc. However, analytes, such as adenosine triphosphate (ATP) can adsorb onto glass – making HDPE the preferred container material for samples to be tested for ATP. - Bucket, 5 gal (20 L)
- Funnel
- Gloves, surgical
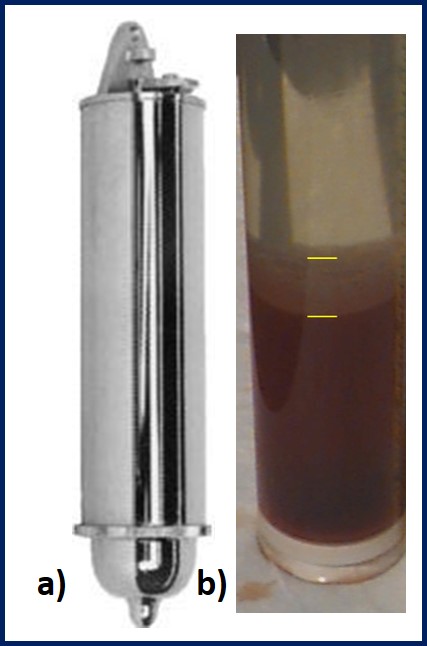
- Sampler – Bacon bomb or bailer (figure 2)
- Sounding tape
Procedure
- 1. Place absorbent spill pads on ground around drain to ensure that any spillage or splashing will be captured by pads.
- 2. Don gloves to protect hands and to reduce risk of contaminating sample with microbes from your skin.
- 3. Use alcohol to wipe down the sampler and funnel.
Note: If multiple samples are being collected, and the previous sample contained visible sludge, sediment, or both, use clean fuel to rinse out the sampler before disinfecting its internal surfaces. - 4. Place sample bottle into bucket.
Note: This serves two purposes: 1) it reduces the risk of spillage onto ground around sampling bottle; and 2) it shields sample bottle from the view of those who are not directly involved in the sampling process – this is particularly important when sampling retail site underground storage tanks. - 5. Attach sampler to sounding tape and lower the sampler into the tank until it touches the tank’s bottom but remains vertical.
Note: Follow standard fuel handling safety precautions to ensure that the sounding tape is properly grounded and that there is no risk of sparking.
Note: Best practice is to first determine the height of any free-water in the tank (figure 3).
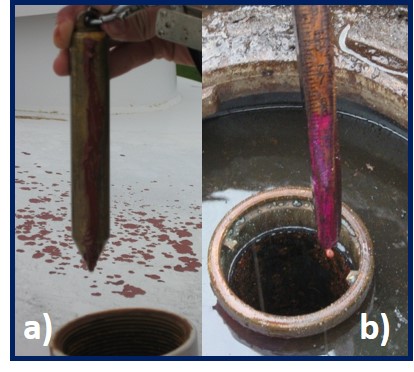
Fig 3. Using water-detection paste to determine height of free-water in tank-bottoms – a) sounding plumb-bob; b) sounding stick. Both devices had been coated with white, water-detection paste that had turned purple on contact with water. - 6. Remove cap from sample bottle, place narrow-end of funnel into sample bottle.
- 7. Recover sampler and place it over funnel.
- 8. Drain contents of sampler into sample bottle (figure 4).
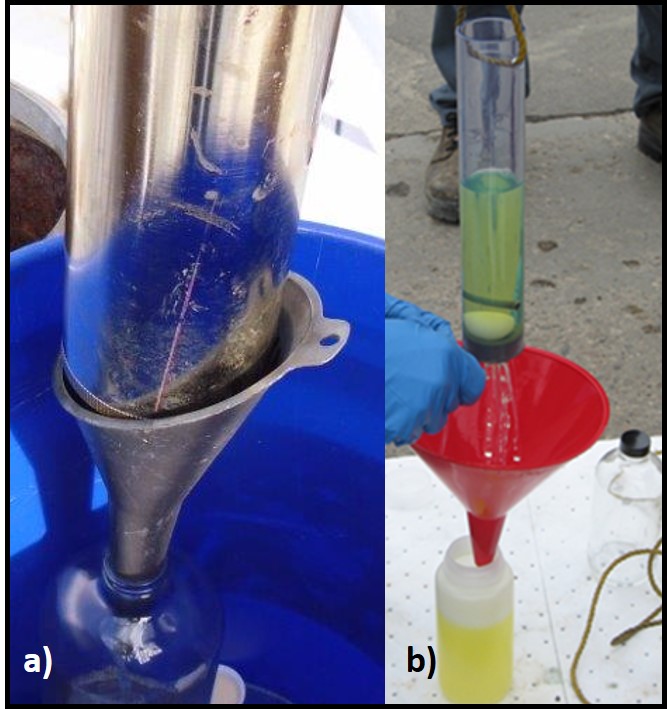
Fig 4. Transferring bottom-samples to sample bottles – a) draining Bacon Bomb sample into glass bottle; b) draining bailer sample into HDPE bottle. - 9. Remove funnel from sample bottle, replace cap, and label sample bottle with:
a. Sample source identification
b. Sample collection date and time
c. Identity of sample collector - 10. If sample is not going to be tested immediately, place in ice of refrigerator.
Sample handling
Best practice is to keep samples chilled (40 2 F; 5 1 C) and to begin microbiological testing within 4h after collection Fuel & Fuel System Microbiology Part 6 explains sample perishability. Samples that have been kept chilled can be tested reliably for up to 24h after collection. The total level of microbial contamination and types of microbes present in the sample are increasingly likely to change as sample age beyond 24h. This makes the test results less likely to reflect conditions inside the tanks from which the sample was originally collected. Consequently, the risk of either failing to detect heavy microbial contamination or incorrectly concluding that actually had negligible contamination when sample was heavily contaminated, increases with sample aging. Microbiological tests like ASTM Method D7687 for ATP are easy to run in the field, immediately after sample collection. Using this type of test eliminates the risks caused by sample aging.
The details
This brief explanation of sampling procedures will get you started on the right path. However, circling back my opening comments, I recommend using ASTM Practice D7464 for detailed, step-by-step sampling instructions, and referring to my sampling chapter in ASTM Manual 1 for a full discussion of the considerations that should be taken into account when deciding when and when to collect samples for microbiological testing. I also address sampling in considerable detail in BCA’s six-module fuel microbiology course. For more details about this course, please contact me at either fredp@biodeterioration.control.com or 01 609.306.5250.
