Beginning with this post, I’m moving into Phase 3 of this series. In the first five posts, I introduced the issues that make fuel system microbiology condition monitoring important. In Part 6 through 8 I covered the foundational concepts of sampling and testing. Now it’s time to talk about actual test methods. The take home lesson here is that you can detect microbial contamination without having a lot of technical training or investing in expensive laboratory facilities.
Gross observations are tests that rely only on our senses. We look at, sniff, and, perhaps, touch samples to determine whether they are likely to be heavily contaminated. We begin by obtaining a useful sample. If you are not sure what I mean by useful sample please read my 28 November 2016 blog post on sampling.
Bottom-sample gross observations work best if you collect the sample from the lowest point in the tank. Underground storage tanks settle unpredictably. The first-time a UST is filled, its 90,000lb weight compresses the backfill on which it rests. Regardless of how well the backfill is prepared, some areas will be softer than others. The UST will continue to compress the backfill for years. This means that it is important to check its trim (angle at which the UST lies) annually. To do this, stick the tank at three points: fill end, turbine end and automatic tank gauge ATG – (usually this will give your fuel levels at each end and the center). The fuel level will be greatest at the UST’s low point. Although most UST are installed to be low at the fill end, Murphy’s Law seems to dictate that much of the time, they settle by the turbine end. Best design is to have an inspection port in the turbine well (figure 1). If find that the UST’s low point is at the turbine end but you can’t sample from that end routinely, sample from the ATG well. Pulling the ATG will give you a chance to look at the ATG’s water float. If it looks like figure 2, you most likely have a microbial contamination problem.
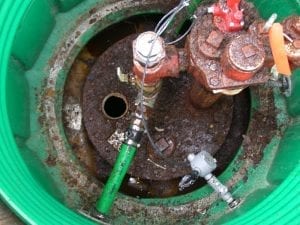
Figure 1. Turbine well showing 4in inspection port just left of center.
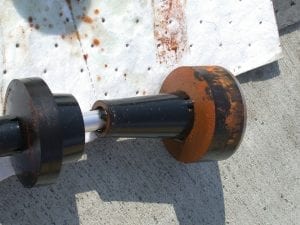
Figure 2. ATG water float covered with microbial contamination.
The two samples most likely to provide the best clues about a fuel system’s condition are bottom samples and components (filter, flow-control valve, automatic tank gauge float, etc.). Let’s focus on bottom samples. If you pull a sample from a tank’s lowest point, and get a sample that looks like figure 3, you can be fairly certain that you do not have a severe microbial contamination issue. On the other hand, if your sample looks like the one in figure 4, there’s a >90% probability that the system is heavily contaminated. Microbes produce chemicals that can emulsify fuel. Hazy fuel or a third layer, between the water and fuel is a sure sign of microbial activity – particularly if the middle layer sticks to the side of the sample bottle as it does in figure 5.

Figure 3. UST bottom sample: there’s no water, and the fuel is clear and bright; water-white.
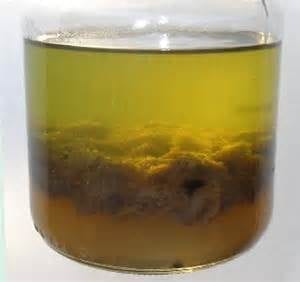
Figure 4. UST bottom sample; A thick rag (invert emulsion) layer separates the hazy fuel from the very turbid, bottoms-water.
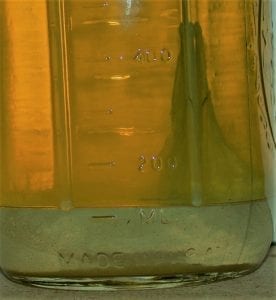
Figure 5. UST bottom sample: rag layer (looks like a hanging drape)
adheres to the sample bottle wall.
Quick, simple, gross observations provide reliable indications of uncontrolled microbial contamination. If your eyes tell you the system is clean, then you don’t need to do any more microbiology testing. If gross observations signal microbial contamination, the next step is to confirm what your eyes are telling you. I’ve just scratched the surface in this blog. If you’d like to learn more, please send me an email at fredp@biodeterioration-control.com.
